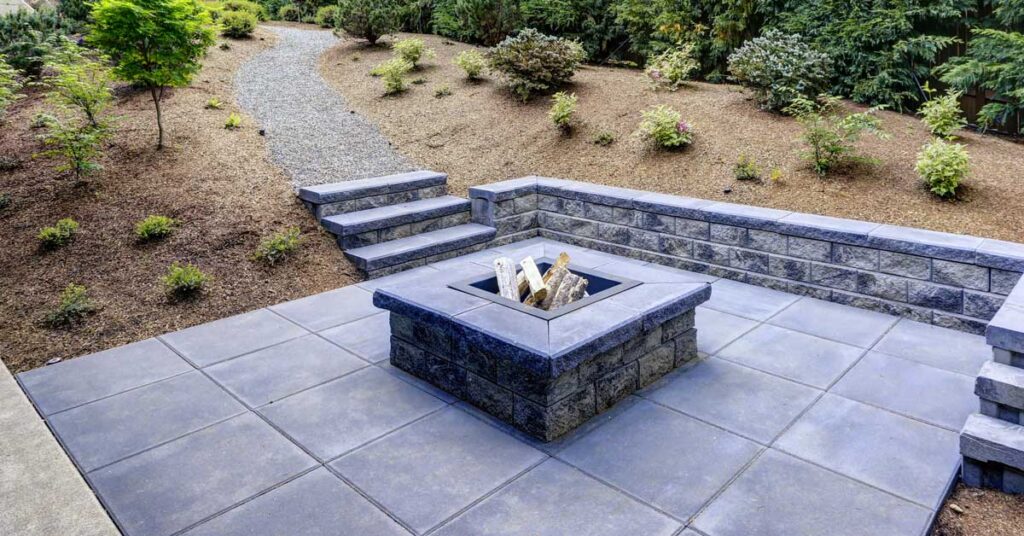
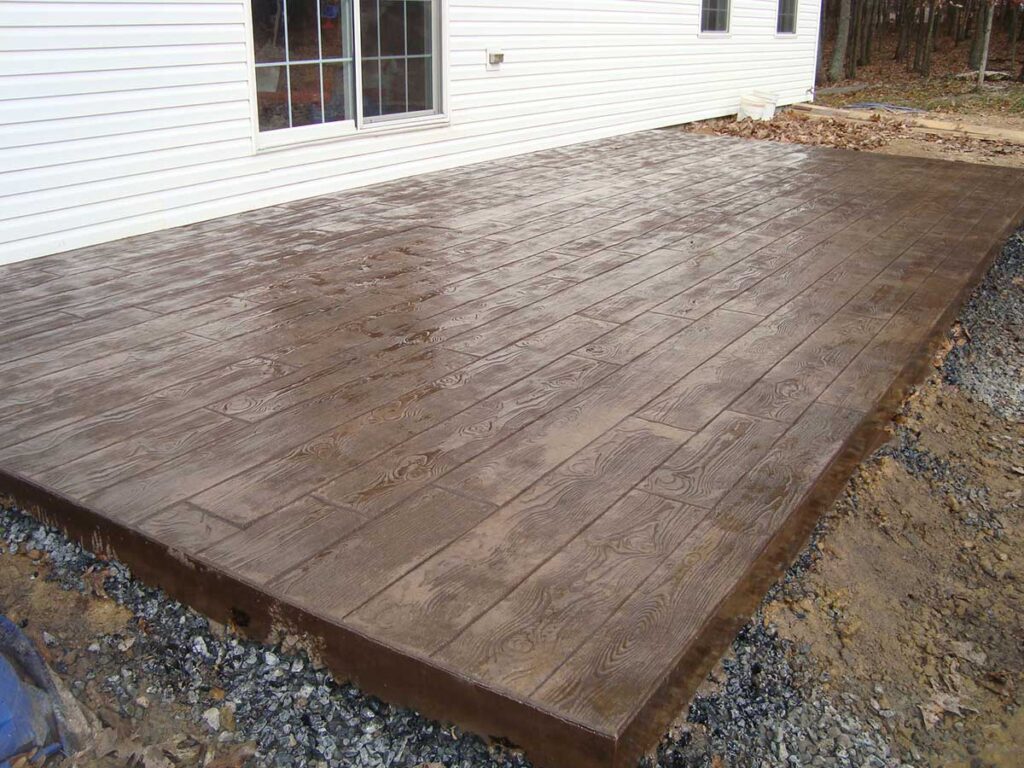
Why pour a concrete patio?
A concrete patio is a great addition to any outdoor living space. It provides a solid foundation for your outdoor furniture, cooking appliances, and even a place to gather with friends and family. There are many reasons why a concrete patio is a practical and worthwhile investment.
Firstly, a concrete patio is a durable and long-lasting option. It can withstand harsh weather conditions, including extreme heat, cold, and rain. Because it is a solid surface, it is also less prone to cracking or shifting compared to other patio materials like pavers or wood.
Secondly, a concrete patio offers versatility in terms of design and color options. With various techniques to customize the appearance of the concrete surface, you can create a unique and stylish look that complements your home’s style and color scheme.
Lastly, pouring a concrete patio can increase the value of your property. A well-built and well-designed outdoor living space will attract potential buyers. Also, if you plan on staying in your home for the long-term, a concrete patio is a fantastic investment that will provide enjoyment for years to come.
While hiring a concrete contractor for your patio installation can be expensive, it is a complex project that requires specific knowledge and tools. However, there are DIY options available for those who are comfortable with the process and have access to the necessary equipment.
In summary, pouring a concrete patio is an excellent idea for those looking to enhance their outdoor living space. It provides durability, versatility, and investment value, and can be completed by either hiring a contractor or as a DIY project.
What kind of preparation is needed?
If you’re considering pouring your own concrete patio, proper preparation is key for a successful outcome. Before you even begin the project, you need to consider a few things.
Firstly, you’ll need to determine the size and shape of your patio. This will help you figure out how much material you’ll need and what the overall cost will be. Once you have your measurements, you can purchase the necessary tools and materials, including form boards, concrete mix, and reinforcing materials like wire mesh.
Next, you’ll need to prepare the site where the patio will be constructed. Start by removing any grass, rocks, or other debris from the area. You’ll need to dig down to a depth of about 4-6 inches to create a stable base for your patio.
After the area has been excavated, the soil should be compacted with a plate compactor or a hand tamper. This will ensure that the surface is level and even, which is important for the next step – laying a layer of gravel.
A layer of at least 2-3 inches of gravel should be spread evenly over the excavated area. This helps with drainage and provides a stable base for the concrete slab.
Once the gravel layer is down, you’ll need to construct the form boards that will hold the wet concrete in place. These can be made from wood or metal and should be anchored securely to the ground.
Finally, before pouring the concrete, make sure to apply a commercial release agent to the form boards to keep the concrete from sticking to them. You can also add control joints and isolation joints to the concrete to prevent cracking and allow for expansion and contraction.
With proper preparation, pouring your own concrete patio can be a satisfying DIY project. It’s important to take the time to properly prepare the site and gather all the necessary tools and materials before starting the project to ensure a successful outcome.
Materials Needed
Building your own concrete patio requires some specific materials that are essential for the project to be successful. Here’s a breakdown of what you’ll need:
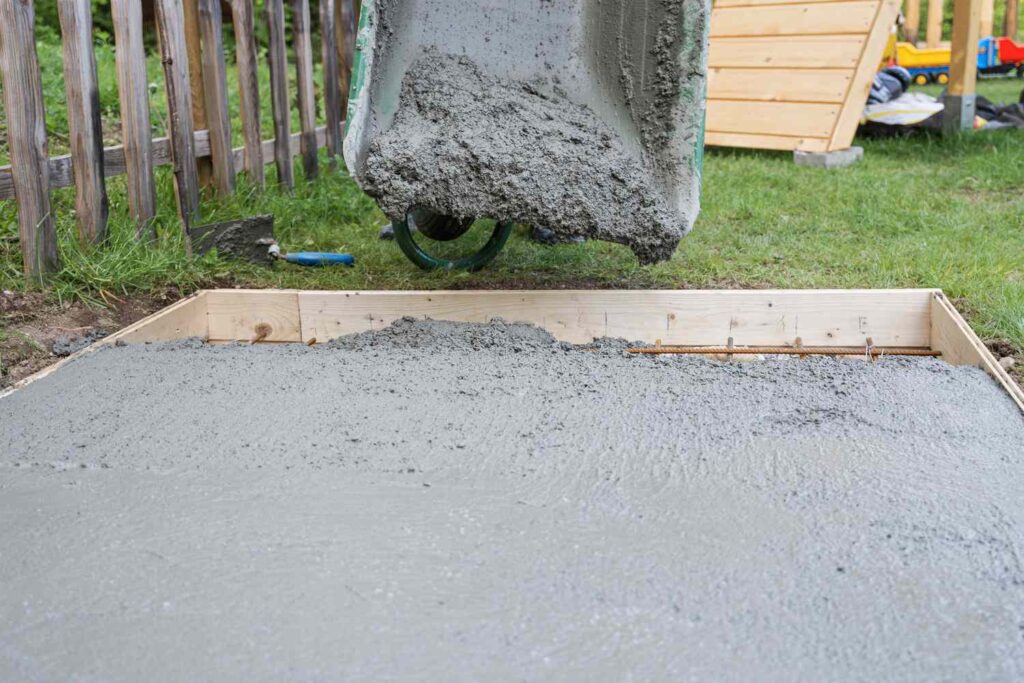
1. Concrete Mix: This is the most important material that you’ll need for your project. Choose a high-quality mix that contains the right mix of cement, sand, and gravel. You can purchase pre-mixed bags of concrete from a hardware store or a home improvement center. Alternatively, you can order a ready-mix concrete truck to deliver directly to your site.
2. Reinforcing Materials: Reinforcing materials like wire mesh, rebar, or fiber additives can be included in your concrete mix to improve its strength and stability. This will help prevent cracks and ensure that your patio will last for many years.
3. Form Boards: Form boards are temporary structures that are used to contain the wet concrete in the desired shape and prevent it from spreading while it cures. You can use either wood or metal to construct your form boards.
4. Gravel: Before pouring your concrete, you’ll need to lay down a layer of gravel. This helps with drainage and provides a stable base for your patio. Use a layer of at least 2-3 inches of gravel and make sure it’s spread evenly over the surface.
5. Release Agent: This is a special solution that is applied to the form boards to prevent the concrete from sticking to them. You can purchase commercial release agents that are specifically designed for this purpose.
6. Control Joints: Control joints are filled with a flexible material that allows the concrete to expand and contract while preventing cracking. They can be applied on the surface of your concrete slab as it’s poured or added later as a saw cut.
7. Isolation Joints: These are gaps between the patio and any nearby structures like your house or garage. They are filled with a flexible material and are designed to prevent any stress or movement from shifting onto the concrete.
By having all the necessary materials for your project, you can ensure that your concrete patio will be strong, durable, and properly constructed.
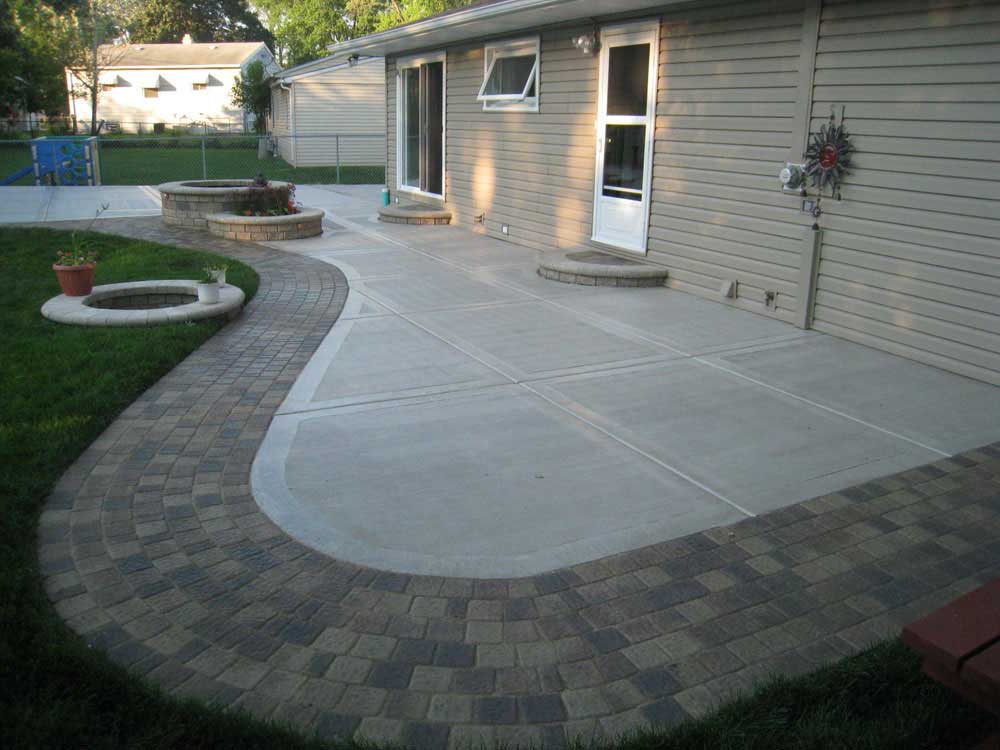
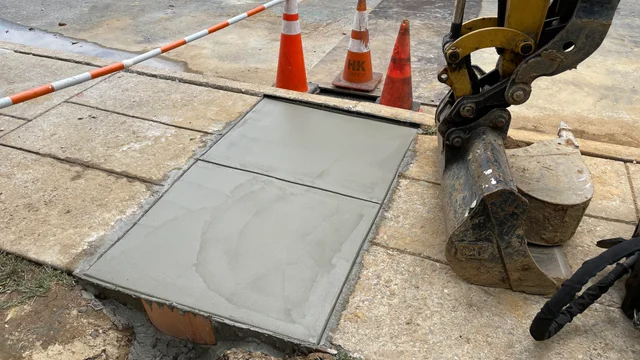
Concrete Slabs
If you’re looking to create a sturdy and durable surface for your outdoor area, a concrete slab could be the perfect solution. Concrete slabs are essentially large, flat pieces of concrete that are poured onto a prepared surface and left to cure. They can be used for a range of applications, from creating a patio or walkway to building a foundation for a shed or garage.
To begin the process of pouring a concrete slab, you’ll need to prepare your site by clearing the area and ensuring that it’s level. This typically involves digging out and removing any grass, soil or other debris, then adding a layer of compacted gravel to create a stable base. Once the site is prepped, you can start building your formwork – essentially a frame into which the wet concrete will be poured. This might involve using wooden planks or metal sheets to create a box-like structure that runs around the perimeter of the concrete slab.
Before pouring the concrete, it’s important to make sure that you have the right mix. A high-quality concrete mix should contain the right balance of sand, cement and aggregate, as well as any additional additives that you might choose to include for strength or durability. Once the mix is prepared, it can be poured into the formwork and left to settle.
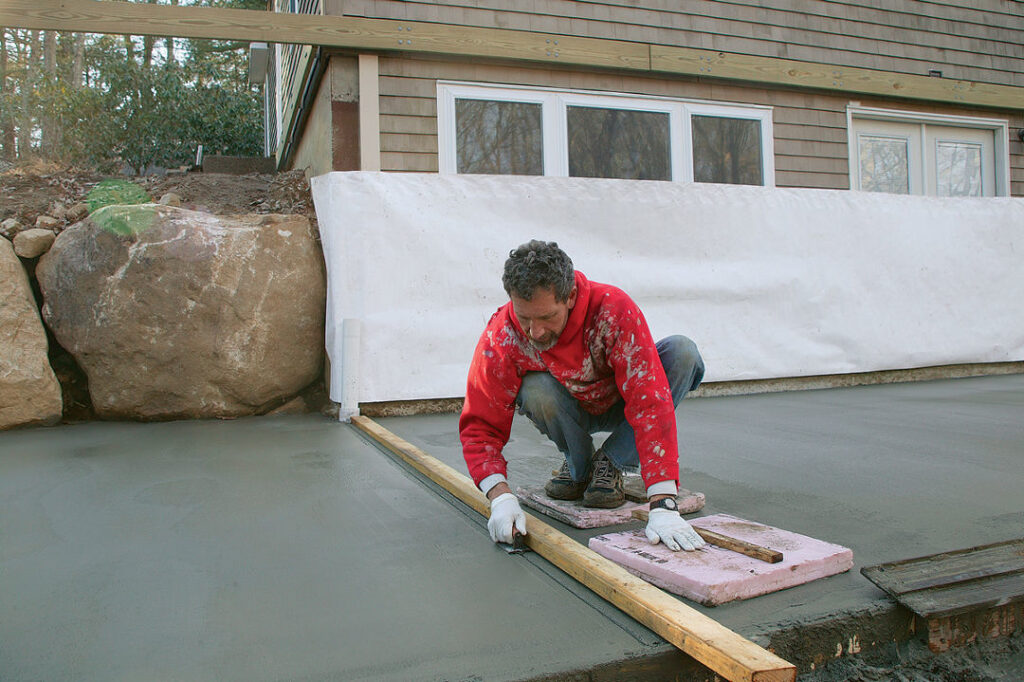
One of the biggest challenges when working with concrete is ensuring that it cures smoothly and evenly. This typically involves using tools like a bull float, a magnesium float or a stiff-bristled broom to smooth out any rough areas, remove air pockets and create a level surface. Once the concrete has cured, you can add control joints – essentially cuts in the surface of the slab – to help prevent cracking as the concrete expands and contracts.
Overall, paving a concrete slab is a great option for anyone looking to create a sturdy, long-lasting surface in their outdoor area. With a bit of preparation and the right mix of materials, it’s possible to create a smooth, even and durable concrete slab that will last for many years to come.
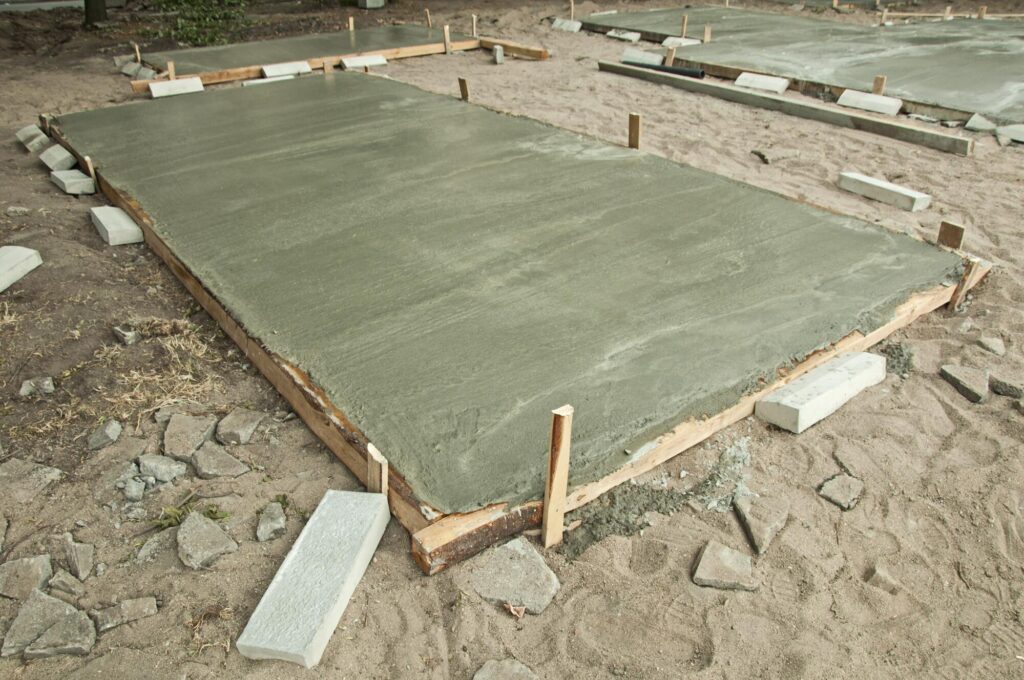
Form Boards
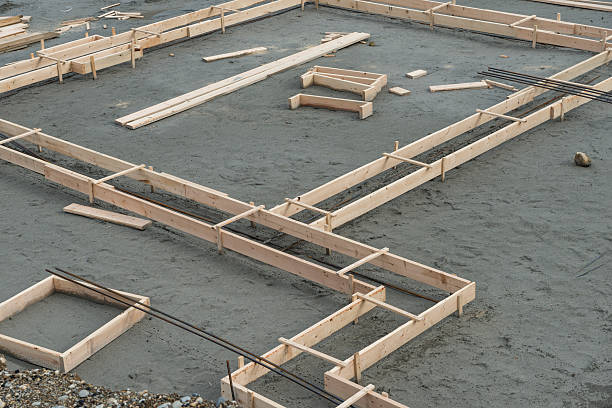
Form boards are an essential component when it comes to pouring concrete patios. These boards are used to create a mold for the concrete and are typically made from wood or metal. Their main purpose is to hold the concrete in place while it cures and prevent it from spreading outwards or settling unevenly.
When installing your form boards, you’ll want to make sure they’re placed on a level surface. This will help ensure that the concrete slab is also level and won’t create any unwanted dips or bumps. Additionally, you’ll need to make sure the boards are securely anchored into the ground. This will help prevent them from shifting or moving as you pour in the wet concrete.
Form boards also come in a variety of sizes and shapes, depending on the complexity of your project. For instance, if you’re pouring a simple rectangular patio, you’ll only need straight boards that can create a frame around the perimeter of the area. However, if you’re working on a patio that has unique curves or angles, you’ll need to invest in more specialized form boards that can bend and shape to meet these requirements.
Once your form boards are in place, it’s crucial to double-check their levelness and alignment before pouring the concrete. Any inconsistencies in the formwork can lead to a lopsided or uneven concrete slab, which can be difficult (and costly) to fix after the fact.
Finally, after the concrete has cured, you’ll need to remove the form boards carefully. This is typically done by prying them away from the concrete slab with a hammer and chisel or a pry bar. It’s essential to be gentle and careful when doing this, though, as any sudden movements can cause the concrete to crack or shift.
Overall, form boards are a critical component when it comes to pouring your own concrete patio. By taking the time to choose the right materials and ensure their precise installation, you’ll be well on your way to creating a beautiful and functional outdoor living space.
Gravel Layer

When it comes to pouring a concrete patio, one of the most important elements to consider is the layer of gravel that goes underneath the concrete surface. This layer serves as a stable base upon which the concrete can be poured, acting as a buffer between the soil and concrete, and helping to prevent shifting and settling.
So, what exactly is a gravel layer, and why is it so important for a successful concrete patio installation? And how do you go about properly installing one?
First, let’s define what we mean by a gravel layer. This layer typically consists of a bed of compacted gravel that is placed on top of the soil, and then leveled and smoothed out to provide a stable and even surface. The depth of this layer can vary depending on the specific requirements of your project, but it’s typically recommended to have at least 4 inches of compacted gravel for a patio installation.
So why is a gravel layer so crucial? Firstly, it helps to improve drainage and prevent water from pooling on the surface of the patio. This is especially important in areas with heavy rainfall or where surface water may be an issue. Additionally, the gravel layer provides a stable and level surface for your formwork and concrete to rest on, helping to ensure a smooth and even surface once the concrete is poured.
When installing the gravel layer, it’s important to start by excavating the soil to the necessary depth. This may involve removing any topsoil or vegetation in the area, as well as ensuring that the soil is properly compacted and leveled before adding the gravel layer. The gravel itself should be a hard, angular material that is free of debris and can be easily compacted to create a solid base.
Once the gravel layer is in place, it’s important to compact it thoroughly with a plate compactor or similar tool. This will help to ensure that the layer is level and stable, and that there are no voids or pockets that could cause the concrete to shift or settle over time. After the gravel layer is compacted, it’s ready for the formwork and concrete to be poured.
In conclusion, a properly installed gravel layer is an essential component of any concrete patio project. It provides a stable and level base for the concrete to rest on, helps to improve drainage and prevent water damage, and can help to ensure a long-lasting and durable patio that will stand up to the test of time. By taking the time to properly install a gravel layer, you can help to ensure the success of your patio installation and enjoy years of outdoor living on a smooth and solid surface.
Commercial Release Agent
Commercial release agents are an essential component of any concrete patio installation project. Also known as form release agents, these products are designed to help release the concrete from the formwork once it has cured, leaving behind a smooth and consistent surface.
There are a variety of commercial release agents available on the market, each with its own unique properties and benefits. Some are designed for use with specific types of formwork, such as wood or metal, while others are more versatile and can be used with any type of formwork.
One important consideration when selecting a commercial release agent is the type of finish that you want for your patio. Some agents are designed to produce a glossy, polished finish, while others are better suited for a more matte or textured appearance.
Another important factor to consider is the environmental impact of the release agent. Some products contain harsh chemicals and solvents that can be damaging to the environment, while others are formulated to be more eco-friendly.
When using a commercial release agent, it’s important to follow the manufacturer’s instructions carefully, including the recommended application rate and timing. Applying too much release agent can result in excess buildup on the surface of the concrete, while applying too little may not provide enough lubrication to release the concrete from the formwork.
Overall, the use of a high-quality commercial release agent can help to ensure a successful and professional-looking concrete patio installation. By selecting the right product for your project and using it correctly, you can achieve a beautiful and long-lasting patio surface that will provide years of enjoyment for you and your family.
Ready-Mix Concrete or Bags of Concrete
Ready-mix concrete and bags of concrete are two popular options for DIY concrete projects. While both options share similarities, there are some important differences to consider when deciding between the two.
Ready-mix concrete is manufactured in a batching plant and delivered to your site in a truck mixer. The concrete is already mixed and is ready to be poured as soon as it arrives. This can be a convenient option for larger projects as it eliminates the need for mixing the concrete yourself. Ready-mix concrete is also a more precise option as it is already mixed to the correct water-cement ratio, ensuring that the concrete will have the proper strength.
On the other hand, bags of concrete come in dry form and require mixing with water before use. They are a popular option for smaller projects and can be a more cost-effective choice. Bags of concrete also offer more flexibility in terms of quantity, as you can purchase the exact amount needed for your project.
When choosing between ready-mix concrete and bags of concrete, it is important to consider the specific needs of your project. Ready-mix concrete may be more expensive but can offer more convenience, precision, and consistency. Bags of concrete may be a more affordable option for smaller projects and offer more flexibility in terms of quantity.
Regardless of which option you choose, it is important to follow the manufacturer’s instructions carefully and to use the proper tools and equipment for mixing and pouring the concrete. This includes using the correct amount of water and achieving the proper consistency of the concrete mix.
In summary, both ready-mix concrete and bags of concrete have their advantages and disadvantages. Consider the size and scope of your project, your budget, and your personal preferences before deciding which option is best for you. With the right materials and proper technique, you can achieve a strong and durable concrete surface that will last for years to come.
Bull Float, Edger, and Trowel
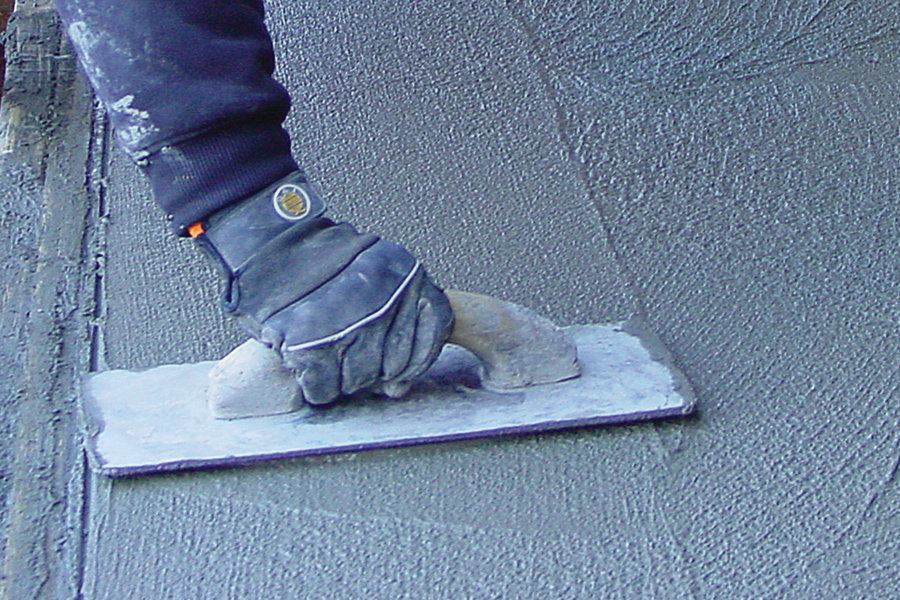
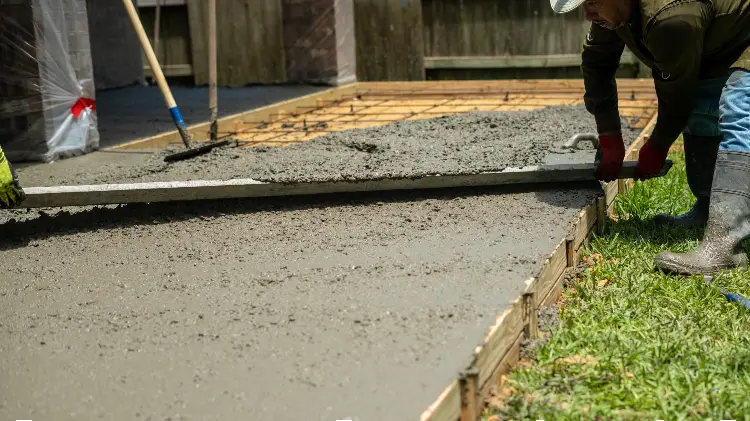
When it comes to concrete finishing tools, there are a few key players that every DIY enthusiast or professional contractor should be familiar with. The bull float, edger, and trowel are all essential tools for achieving a smooth and professional-looking concrete surface.
The bull float is a large rectangular tool that is used to smooth out and level the concrete surface. It features a long handle that allows the user to reach across large areas of concrete without having to walk on it. The bull float is typically used after the concrete has been poured and excess water has been removed. An experienced user can get the surface perfectly flat and level with the bull float, reducing the need for additional smoothing later on.
An edger is a round tool that is used to create a rounded edge along the perimeter of the concrete surface. This small but important detail not only adds a decorative touch but also helps prevent chipping and cracking along the edges of the slab. An edger should be used immediately after the concrete has been poured and before the surface has begun to harden.
Finally, the trowel is used for smoothing out small imperfections in the surface of the concrete. It is a rectangular tool with a handle that is held at a 45-degree angle. The user applies pressure to the trowel and guides it over the surface of the concrete, smoothing out any small bumps or ridges that may be present. This tool is often used after the bull float and edger have been applied to achieve maximum smoothness.
Using these three tools together can result in a beautiful, professional-looking concrete surface that will last for years to come. Professional concrete contractors will often have a range of finishing tools on hand, including magnesium floats and power trowels, but for most DIY projects, a bull float, edger, and trowel will be more than sufficient. Remember to always follow manufacturer instructions for the specific tools you are using and follow safety precautions to avoid injury. With the right tools and techniques, anyone can achieve a stunning and long-lasting concrete surface.
Preparing the Site for Pouring the Patio
Before you can even begin to pour your own concrete patio, it’s crucial to ensure that the site is properly prepared. This step is essential to ensuring that the final result is a level, long-lasting surface that can withstand the test of time. Below are the basic steps you need to take to prepare the site for pouring the patio.
1. Measure and Mark the Area: The first step in preparing your site is to measure and mark the area you want to pour. Use stakes and string to outline the size and shape of your patio. This step will give you a visual idea of the space you’ll be working with, and help you determine the amount of concrete you’ll need for the project.
2. Clear the Area: With a defined area in place, it’s important to clear the site of any debris, including rocks, roots, and plants. Make sure to remove as much of the existing dirt and soil as possible, since a solid base will be essential for a successful concrete pour.
3. Grade and Level the Area: Once the site is cleared, you should grade the area to create a slight sloping grade for water drainage. Use a level to make sure that the slope is uniform and that your patio surface will be level. You may need to use a shovel and some additional dirt to build up low areas or smooth out high spots to achieve the desired slope.
4. Install Form Boards: Next, you’ll need to place forms around the perimeter of your patio. These boards will hold the concrete in place while it cures, creating a clean, defined edge. Use pieces of wood or metal stakes to create a frame around the edges of your patio. Make sure that the form is level and straight to ensure a flat, even surface.
5. Add a Layer of Gravel: To further support the stability of your patio, it’s recommended to add a layer of compacted gravel underneath the concrete. This will help ensure proper water drainage, and prevent the concrete from sinking or cracking.
With these steps completed, your site is now ready for pouring the patio. Following these important preparatory steps will ensure that your DIY project will be a success, resulting in a beautiful and functional outdoor living space for years to come.
Removing Old Surface Materials
When it comes to pouring a new concrete patio, one of the first things you need to consider is the state of your current outdoor space. If there are old surfaces, such as a decaying wood deck or concrete slab, you’ll need to remove them before starting with the new concrete pour. Here are the steps you should follow to remove old surface materials and prepare your outdoor space for a successful concrete pour:
1. Assess the Condition of your Current Surface: Before you start any demolition work, it’s important to assess the condition of your current surface. If you’re dealing with a concrete slab that’s in good condition, you may only need to clean it thoroughly and prepare it for a new pour. However, if there are repair issues or major degradations, you may need to remove the entire slab and start from scratch.
2. Prepare the Surface for Demolition: If you decide to remove the old surface, you’ll need to prepare the area first. This involves removing furniture, plants, and other outdoor items, and setting up a space to work in. Make sure to cover any nearby structures or surfaces with tarps to protect them from debris.
3. Rent the Proper Demolition Equipment: To remove the old surface materials, you’ll need to rent specialized demolition equipment such as a jackhammer, a sledgehammer or a demolition saw depending on the surface and the scale of the project.
4. Start Demolition Work: Once you have secured the proper equipment, you can start breaking up the old surface material. Be sure to work slowly and carefully to avoid damaging any underlying structures, such as drainage pipes or electrical lines.
5. Clean Up and Prep the Surface for the New Pour: After the demolition work is complete, it’s important to clean up the debris and prepare the surface for the new pour. This involves removing any remaining pieces of debris, smoothing out the surface, and correcting any drainage or grading issues that may have been present.
By following these steps, you can successfully remove old surfaces and prepare your outdoor space for a new concrete patio. While the process can be time-consuming, it is important to take the necessary steps to ensure that your new patio is safe, stable, and long-lasting.
Leveling the Ground
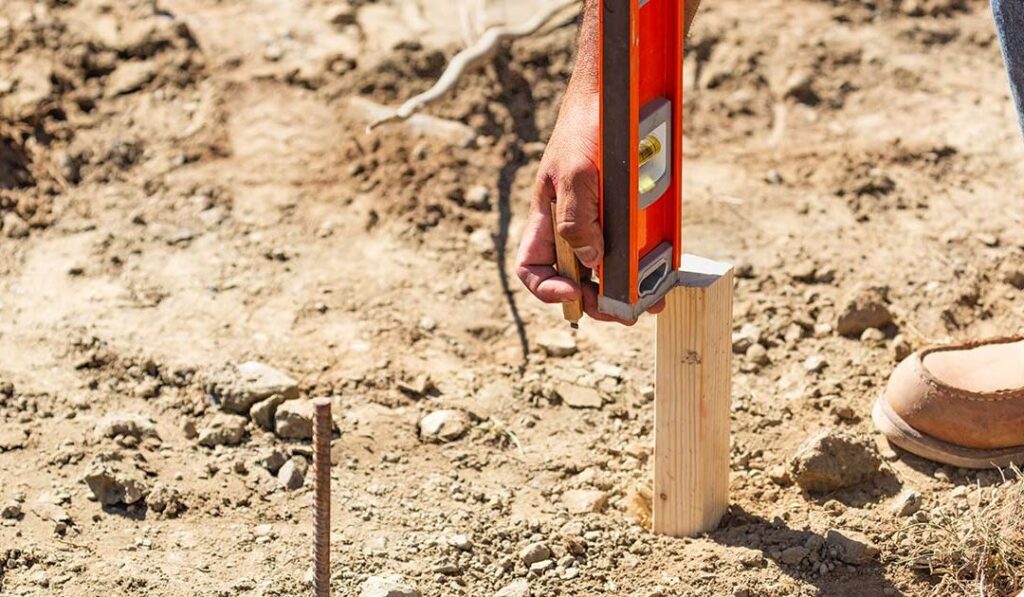
When it comes to pouring a concrete patio or slab, one of the most important steps is leveling the ground. This process involves creating a flat and even surface for the concrete to be poured on, which will ensure that your finished product is strong and stable.
The first step to leveling the ground is to locate the highest point on your site. This can usually be done using a long spirit level or a leveling tool. Once you have identified this point, you can use it as a reference point to determine how much soil needs to be removed or added to achieve a level ground.
If you have a significant amount of soil to remove, you may need to rent an earthmoving machine, such as a backhoe or a skid steer loader. These machines can help you remove large volumes of soil in a short amount of time, allowing you to level the ground more efficiently.
Next, you will need to compact the remaining soil to create a firm base. Soil that has been disturbed by heavy machinery or excavation can be loose and unstable, which can lead to settling or shifting of the concrete later on. To avoid this, use a compaction tool, such as a plate compactor or a hand tamper, to compress the soil and create a stable base.
Once the soil has been compacted, you can add a layer of gravel to further improve drainage and stability. This layer should be at least 4 inches thick and should be evenly spread across the entire surface. Be sure to compact the gravel layer as well to ensure that it is firmly in place.
Finally, it’s important to re-check your leveling using your reference point to confirm that your surface is level. Any adjustments can be made by adding or removing soil as needed until you achieve the desired level surface.
In conclusion, leveling the ground is a crucial step towards a successful concrete pour. By taking the time to properly level and prepare your site, you can ensure that your finished product will be strong, stable, and built to last.
Inspecting the Ground for Drainage Issues
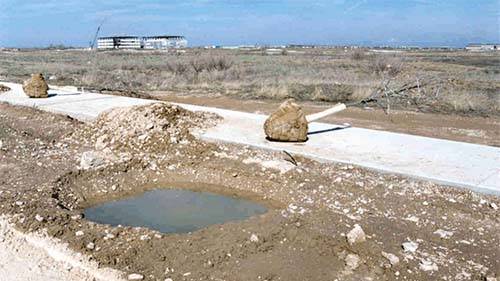
When planning to pour a concrete patio, it’s essential to inspect the ground for any drainage issues that may impact the integrity of the structure. A poorly drained area can lead to water pooling and saturating the soil beneath the slab, which can ultimately cause cracking, settling, and shifting.
One way to assess the drainage of the soil is to observe the area during a rainstorm. If the rainwater quickly runs off the surface and does not create any puddles or standing water, then the site likely has good drainage. However, if water accumulates and takes longer to dissipate, there may be drainage issues that require attention.
Another way to inspect the ground for drainage problems is to dig a small hole, about a foot deep, and fill it with water. Observe how quickly the water drains away or if it pools in the hole. If the water drains away quickly, then the soil has adequate drainage. However, if the water remains in the hole for a long time, it could indicate that the soil is compacted, too dense, or has limited permeability.
In some cases, it may be necessary to install a drainage system to help water flow away from the patio area. This system could include a French drain, which is a trench filled with gravel and a perforated pipe that collects and redirects water away from the site. Another option is to create a sloped grade that directs water away from the patio and towards a designated drainage area.
Ignoring drainage issues can lead to costly repairs, so it’s crucial to assess the ground before pouring concrete. By taking a close look at the ground and addressing any drainage issues beforehand, you can ensure that your concrete patio will remain strong and stable for many years to come.
Digging Out Low Areas and Adding Fill Material
When preparing your backyard for a concrete patio installation, it’s important to ensure that the ground is level and well-drained. Uneven areas in the ground can cause the patio to shift or crack over time, so it’s important to address any low spots before pouring the concrete. One way to address these low areas is to dig them out and add fill material.
First, use a shovel or a spade to dig out the low areas. You’ll want to dig deep enough to remove any top soil and ensure that you’ve reached the solid subsoil. This will allow for proper compaction of the fill material later on. Be sure to remove any rocks, roots, or debris that you encounter during the digging process.
Once the low areas have been excavated, it’s time to add the fill material. For small areas, you can use a mixture of half sand and half gravel. For larger areas, it’s best to use a compactible fill material, such as crushed stone or recycled concrete. You’ll want to add the fill material in several layers, compacting each layer as you go. This will ensure that the fill material is evenly distributed and tightly packed.
Use a plate compactor or a hand tamper to compact each layer of fill material. This will help to ensure that the fill material is well-settled and won’t shift over time. Take your time and be thorough, paying special attention to the edges of the area where the patio will be poured.
After the fill material has been installed and compacted, it’s important to make sure that the area is level. Use a long straight edge or a level to check for any high or low spots. If you encounter any areas that are still uneven, you can add more fill material and repeat the compaction process until the area is level.
By taking the time to dig out low areas and add fill material, you’ll ensure that your concrete patio is properly supported and will last for many years to come. As always, if you’re unsure about any part of the process, it’s best to consult with a professional concrete contractor who can provide expert guidance and ensure that your patio is installed correctly.
Laying Down Tarps or Plastic Sheeting as Protection from Excess Moisture
When you’re embarking on a home improvement project, it’s crucial to protect your space from excess moisture. This includes laying down tarps or plastic sheeting to prevent water damage and ensure that your project is protected from the elements.
Before starting your project, take a moment to assess the area and identify any vulnerable spots. This might include any corners, edges, or areas with poor drainage or ventilation. Once you’ve identified these areas, you can begin laying down tarps or plastic sheeting to protect them.
Start by selecting a high-quality tarp or plastic sheeting material that is durable and waterproof. You’ll want to choose a large enough size to cover the entire area that needs protection, with plenty of extra material to ensure complete coverage.
Next, place the tarp or plastic sheeting directly over the area, making sure to tuck the edges tightly at the corners and edges. You may need to use some additional weight or stakes to keep the covering in place.
If you’re working on an outdoor project, such as a patio or deck, it’s especially important to consider the weather conditions. If rain is in the forecast, be sure to cover your project with tarps or plastic sheeting before the rain begins. This will give your project the best possible protection from excess moisture and water damage.
Finally, be sure to monitor the tarp or plastic sheeting regularly throughout the project. Check for any signs of damage or leaks, and make any necessary repairs as soon as possible.
By taking the time to lay down tarps or plastic sheeting before beginning your home improvement project, you’ll be able to protect your space from excess moisture and ensure that your project is completed with the highest level of quality. Remember to choose a high-quality material, tuck the edges tightly, and monitor the covering regularly for any signs of damage or leaks. With these steps, you’ll be well on your way to a successful home improvement project.