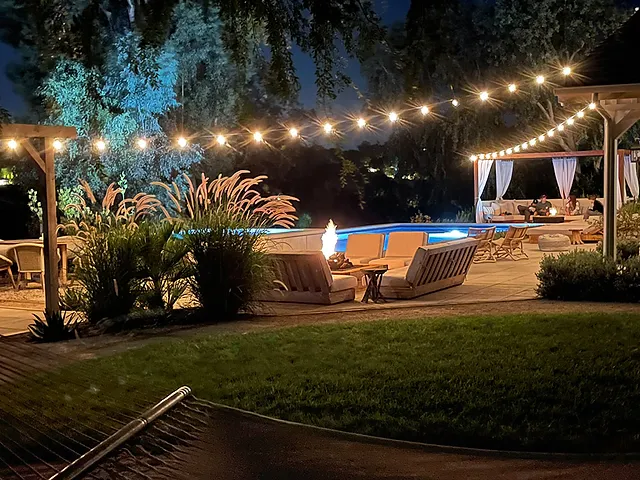
What are Outdoor String Lights?
Outdoor string lights are a popular and stylish way to brighten up any outdoor space, from a small patio to a large backyard. Typically, outdoor string lights consist of a strand of bulbs that are connected by a cord and can be hung from various supports, such as wooden posts or a fence post. These lights can come in many different styles, shapes, and sizes, offering a vast array of lighting options to create any ambiance desired.
The bulbs used for outdoor string lights are typically incandescent or LED bulbs, as these are more durable and weather-resistant than other types of bulbs. Shatterproof bulbs are becoming increasingly popular, as they are built to withstand harsh weather conditions and remain intact even if they are dropped.
Some types of outdoor string lights are designed with an integrated solar panel, making them an energy-efficient and eco-friendly option for outdoor lighting. These solar-powered lights offer a soft, ambient glow and can be placed in areas without access to a power outlet.
Outdoor string lights are not only a functional light source but also serve as a decorative element in many outdoor spaces. From commercial-grade string lights for outdoor events to delicate fairy lights for a cozy backyard atmosphere, the options are endless.
Hanging outdoor string lights can be a fun DIY project that adds character and warmth to any outdoor space. With a few simple tools like a tape measure, pilot hole drill, and cup hooks or command hooks, anyone can transform their patio or backyard into a warm and inviting setting.
Benefits of Installing Outdoor String Lights

Outdoor string lights have become increasingly popular in recent years as they offer a plethora of benefits to homeowners. If you’re looking to enhance your outdoor space and want to create a cozy ambiance, installing outdoor string lights is an excellent way to accomplish your goals. Here are some benefits of installing outdoor string lights on your patio or backyard.
1. Improved Safety: Outdoor string lights can provide an additional layer of security by illuminating your outdoor space. Dark, unlit areas around your home can be dangerous, especially during the evening and night. With outdoor string lights, you can ensure that pathways, entrance areas, and other critical areas are illuminated, providing a safer environment for you and your guests.
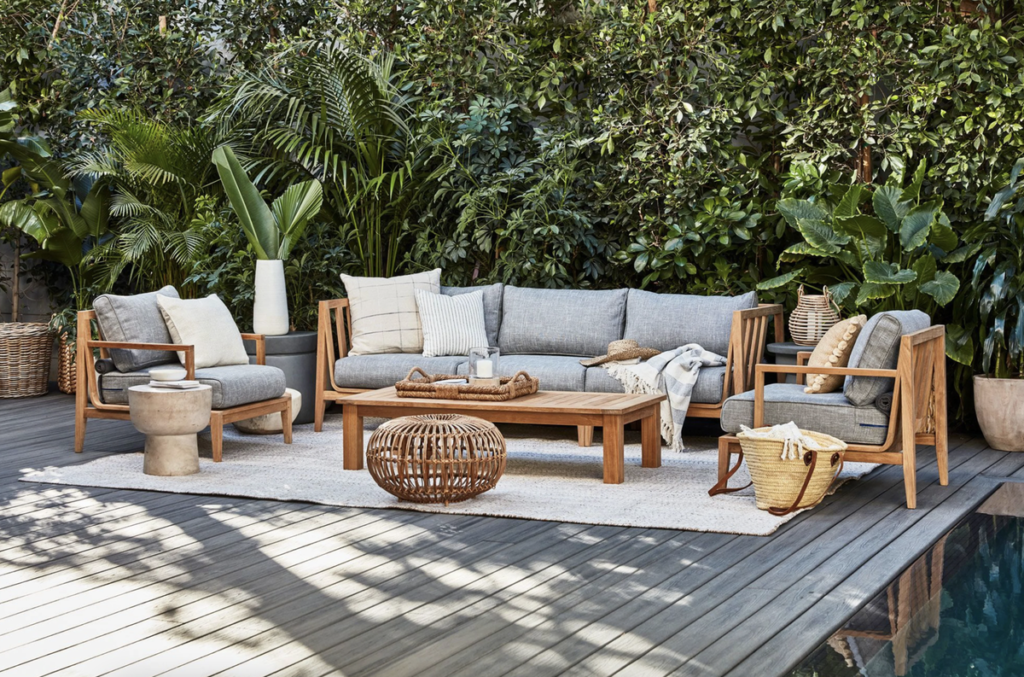
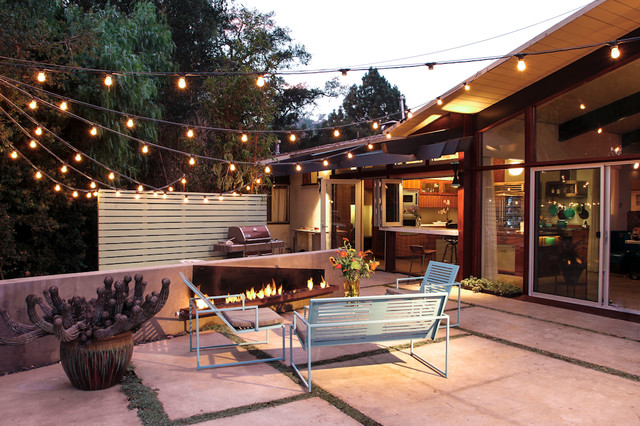
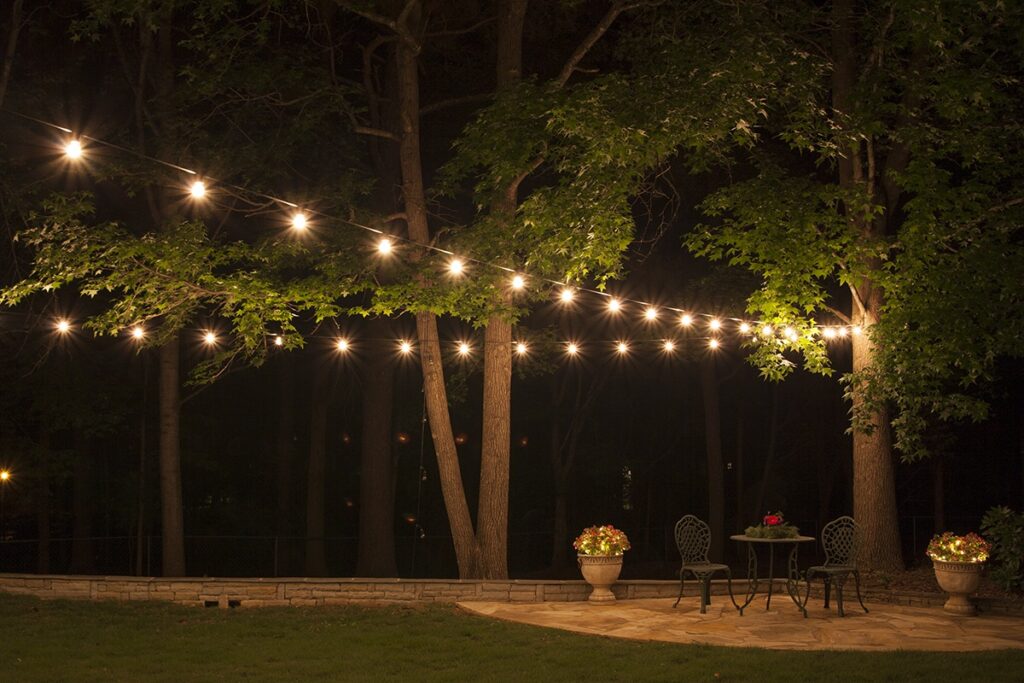
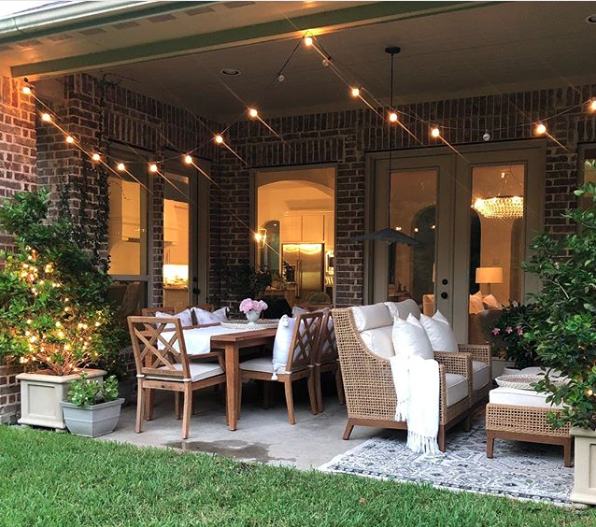
2. Aesthetic Appeal: Outdoor string lights are an excellent addition to any outdoor space as they create a warm and inviting ambiance that enhances the area’s aesthetic appeal. Whether you’re hosting a party or enjoying a quiet night with your loved ones, outdoor string lights can set the mood and create an immersive experience that everyone will enjoy.
3. Versatility: Outdoor string lights come in various styles, shapes, and colors, making them a versatile option for any outdoor space. Whether you want a colorful and playful ambiance or a classic and elegant look, outdoor string lights can be customized to meet your unique needs and preferences.
4. Easy Installation: Installing outdoor string lights is a relatively easy process that doesn’t require any specialized tools or expertise. With cup hooks, command hooks, or wooden posts, you can easily hang your outdoor string lights in the desired areas and create a cozy ambiance that enhances your outdoor space’s beauty.
5. Energy-Efficiency: LED outdoor string lights are energy-efficient and eco-friendly, making them an excellent choice for homeowners who want to minimize their environmental impact. These lights consume significantly less energy than traditional incandescent bulbs, reducing your energy bills and carbon footprint.
In conclusion, installing outdoor string lights is an excellent way to enhance your outdoor space, create a cozy ambiance, and improve safety and security around your home. With their versatility, aesthetic appeal, easy installation, and energy efficiency, outdoor string lights are an investment that will provide endless benefits for years to come.
Choosing the Right Type of Lights
When it comes to choosing the right type of outdoor lights, there are a few important factors to consider. The type of lights you choose can impact the overall aesthetic of your outdoor space, as well as its functionality, safety, and energy efficiency. Here are some of the key factors to consider when selecting the right type of lights for your outdoor space.
1. Functionality: The first factor to consider when choosing outdoor lights is their intended purpose. Are you looking for lights to illuminate pathways and entryways, as a security measure, or simply to create a cozy ambiance? Different types of lights are better suited for different purposes. For example, solar lights are a great choice for illuminating pathways and entryways, while commercial-grade string lights are perfect for creating a warm and inviting atmosphere.
2. Energy Efficiency: Another important consideration is energy efficiency. LED lights are an excellent choice for outdoor lighting as they are highly energy-efficient, consume less power, and last longer than traditional incandescent bulbs. Solar lights are also an excellent choice for energy efficiency, as they draw power from the sun, saving you money on your electricity bills in the long term.
3. Safety: Safety is always a top priority, and the right type of outdoor lights can enhance the safety of your outdoor space. For example, security lights with motion sensors can deter potential intruders and keep your home secure. Pathway lights can also help prevent accidents by illuminating walkways, staircases, and entryways.
4. Aesthetic Appeal: Finally, the type of outdoor lights you select can also have an impact on the overall aesthetic of your outdoor space. Different types of lights can create different atmospheres and moods. For example, soft-glow fairy lights can create a whimsical and romantic ambiance, while large, shatterproof bulbs can create a bold, industrial look.
Choosing the right type of outdoor lights requires careful consideration. By thinking through the functionality, energy efficiency, safety, and aesthetic appeal, you can select the perfect lights for your outdoor space, enhancing its beauty, functionality, and overall appeal.
Incandescent Bulbs vs. LED Bulbs
When it comes to choosing light bulbs, you’ve likely heard the buzz about LED bulbs as a more energy-efficient and cost-effective option than traditional incandescent bulbs. But what makes these bulbs so different, and which one is right for your needs?
Incandescent bulbs have been the standard for many years, but they have some significant drawbacks. These bulbs consume much more electricity than LED bulbs while producing less light. They also have a much shorter lifespan, which means you’ll be replacing them much more frequently.
In contrast, LED bulbs are far more energy-efficient than incandescent bulbs. They use significantly less electricity and produce less heat, which can save you a lot of money on your electricity bills. LED bulbs are also much more durable than incandescent bulbs, with a longer lifespan and resistance to damage from vibrations.
But what about the aesthetics of these bulbs? Incandescent bulbs are known for their warm, soft glow, which is perfect for creating a cozy and comfortable atmosphere. LED bulbs, on the other hand, can be adjusted to produce a range of colors and intensities, including warm and soft lighting.
One of the biggest advantages of LED bulbs is their versatility. They can be used in a variety of settings, including outdoor lighting, which can be challenging for incandescent bulbs due to their sensitivity to temperature changes. Additionally, LED bulbs can be used with dimmers and other lighting controls, giving you more control over the ambiance in your home.
In conclusion, when it comes down to Incandescent vs. LED bulbs, LED bulbs stand out as the clear winner. They are more energy-efficient, more durable, and can provide a versatile range of lighting options. While incandescent bulbs may offer a warm and cozy glow, the long-term savings and benefits of LED bulbs make them a smarter choice in the long run.
Strands of Lights or a Single Strand of Lights?
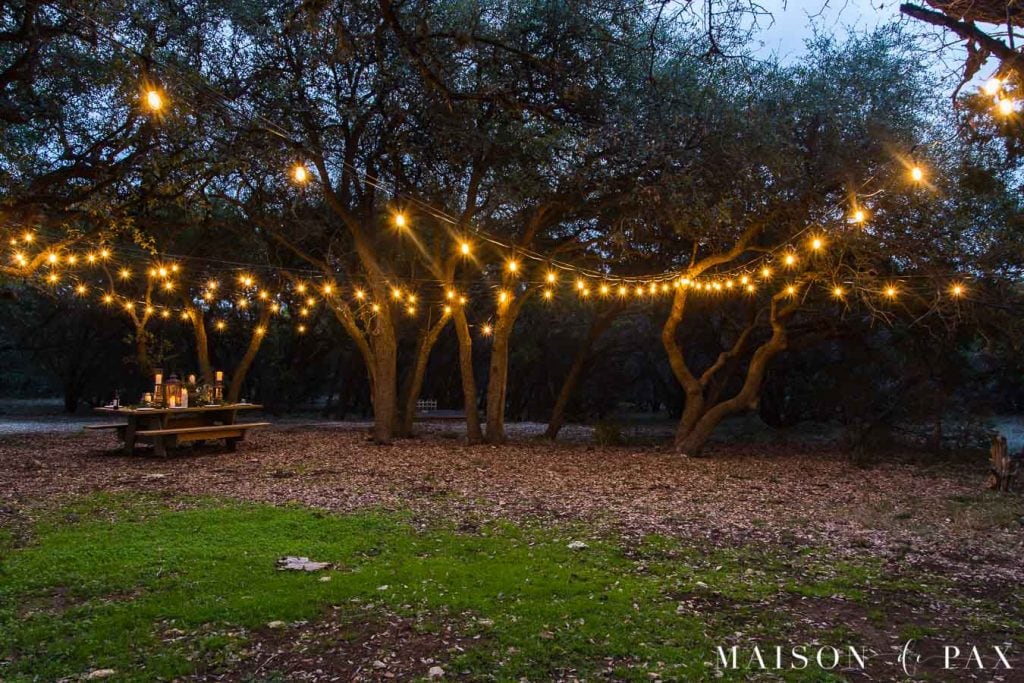
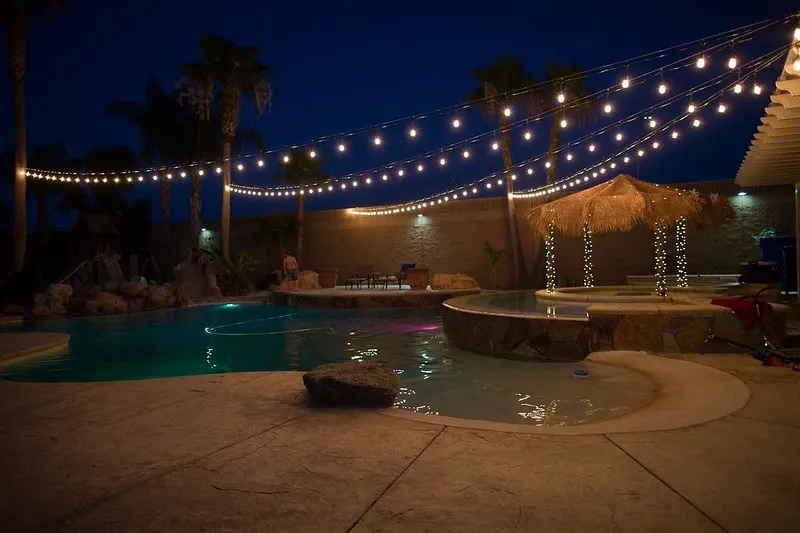
When it comes to outdoor lighting for your patio or backyard, one of the most popular choices is string lights. But when it comes to deciding between using one long strand of lights or multiple shorter strands, there are pros and cons to each option.
Using a single long strand of lights can create a more continuous and streamlined look, especially if you have a large outdoor space that needs to be covered. It also means less work when it comes to setting up and taking down the lights, as there are fewer end points to worry about. Additionally, a single strand may be easier to secure and hang, as you won’t have to worry about multiple anchor points.
However, there are also some downsides to using a single strand of lights. For one, if the lights go out or a section stops working, it can be more difficult to troubleshoot and replace the faulty bulbs or sections. It also may not be as flexible in terms of adjusting the lighting layout or spacing.
On the other hand, using multiple shorter strands of lights can offer more flexibility and customization options. You can create strategic light patterns and designs, and adjust the spacing or positioning more easily. If a section of lights goes out, it’s also easier to replace just that one section instead of the entire strand.
However, using multiple strands can also be more time-consuming and require more anchor points or support structures. It may also be more challenging to ensure that all the strands are evenly spaced and balanced, which can affect the overall cohesive look of the lighting design.
Ultimately, the decision between using one long strand of lights or multiple shorter strands depends on your personal preferences, the size and layout of your outdoor space, and the specific design or ambiance you’re trying to achieve. Regardless of which option you choose, properly hanging and securing the lights with cup hooks, wooden posts, or light poles can help ensure a safe and functional light display for your outdoor gatherings and events.
White Light or Colored Light?
When deciding on the type of lighting to use for your home or event, one of the first choices is often whether to go with white light or colored light. Both options have their benefits and drawbacks, and the decision ultimately depends on your personal preferences and the atmosphere you want to create.
White light is a classic and versatile choice, suitable for a wide range of occasions and settings. It provides a clean, bright and neutral illumination, making it ideal for practical purposes such as reading, cooking, and working. It can also be used to create a warm and cozy ambiance in living areas, as well as a bright and cheerful one in outdoor spaces.
White light comes in different hues, ranging from warm (yellowish) to cool (bluish), and can be adjusted to the desired brightness level. It is especially popular for weddings and other formal events, as it complements all colors and matches any theme or decor. White light is also a good choice for highlighting architectural features, artwork, or plants, as it brings out their natural colors and details.
Colored light, on the other hand, is more playful and festive, and can add a pop of personality and flair to any occasion. It comes in a rainbow of colors, from red to purple, and can be static or changing, depending on the design or effect desired. Colored light is popular for holidays, parties, concerts, and other events that require a fun or dramatic atmosphere.
Colored light can also be used for branding or marketing purposes, as it can create a unique and memorable identity for a business or product. It can be programmed to change according to the mood, message, or time of day, and can be controlled remotely with a smartphone or tablet. Colored light is also a popular choice for stage lighting, where it can enhance the performance and generate excitement among the audience.
In conclusion, whether to choose white light or colored light depends on the context and purpose of the lighting. White light is more practical and versatile, while colored light is more playful and dynamic. Both options have their place and can be combined to achieve a desired effect. The key is to experiment and have fun, and let the light shine in all its glory.
Length of the Strings/Cords
When it comes to hanging outdoor string lights on a patio, one important consideration is the length of the strings or cords being used. The length of the strings will depend on a number of factors, including the size of the patio, the number of lights being used, and the overall design and layout of the space.
In general, it is important to ensure that the strings are long enough to cover the entire area where the lights will be hung, without leaving large gaps or empty spaces. At the same time, it is also important to avoid having strings that are too long, which can lead to excess slack or drooping in the middle.
To determine the ideal length for outdoor string lights on a patio, it can be helpful to create a rough sketch or diagram of the space, taking into account the location of any existing electrical outlets or light poles. This can help to identify any potential obstacles or challenges that may impact the placement of the lights.
Additionally, it is important to consider the type of bulbs being used and their spacing on the string. For example, larger bulbs may require more space between them, while smaller bulbs can be closer together. Shatterproof and LED bulbs are generally preferred for outdoor use, as they are more durable and energy-efficient than traditional incandescent bulbs.
Ultimately, the length of the strings will depend on the specific needs and preferences of the homeowner or event planner. Some may prefer longer strings for a more dramatic effect, while others may choose shorter strings for a more subtle and functional light. Regardless of the length of the strings, it is important to ensure that they are secured properly using cup hooks, wooden posts, or other appropriate anchors to prevent them from falling or causing a safety hazard.
Type of Posts and Installation Hardware Needed
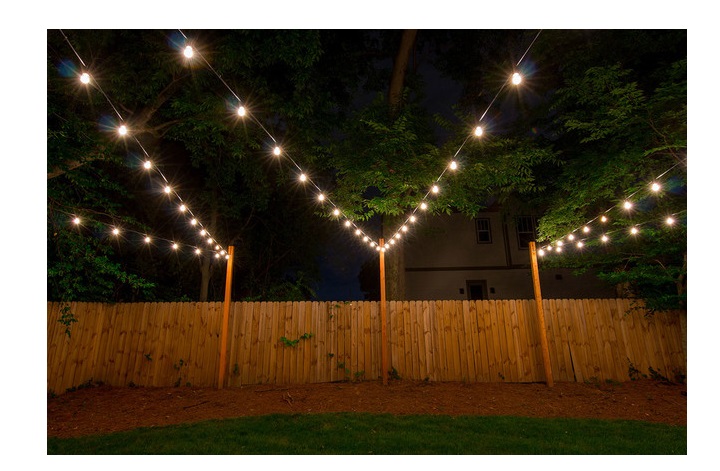
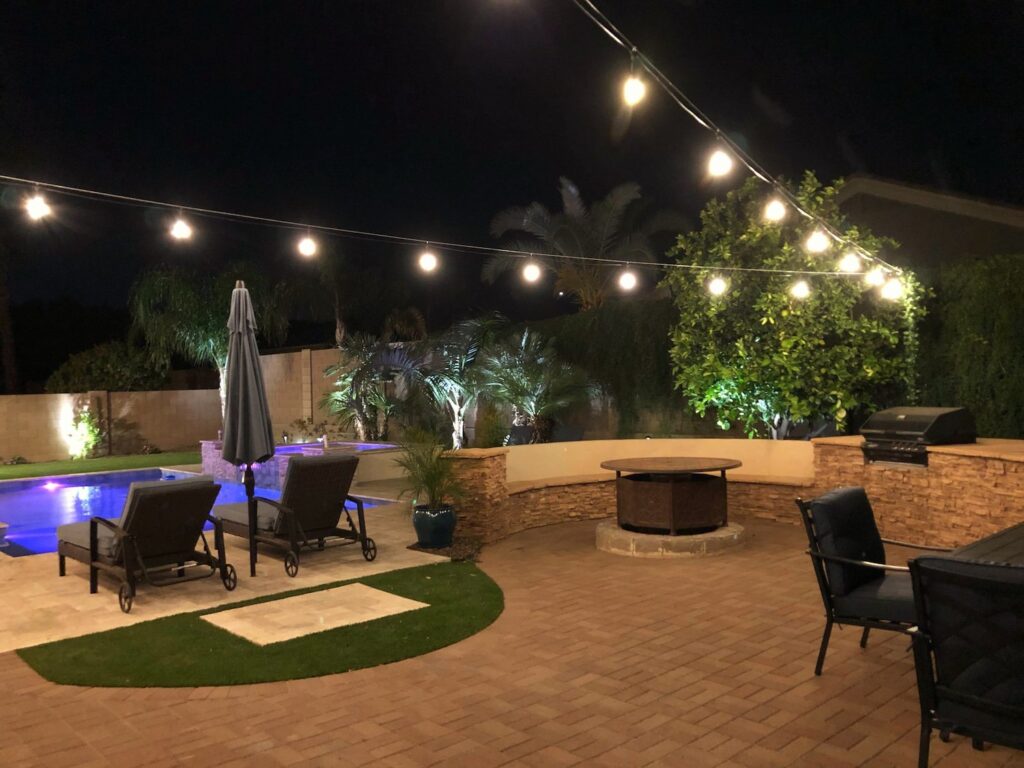
When it comes to hanging outdoor string lights on a patio, the type of posts and installation hardware you use can make a big difference in the durability and attractiveness of your setup. There are several options available for both posts and hardware, each with their own advantages and disadvantages.
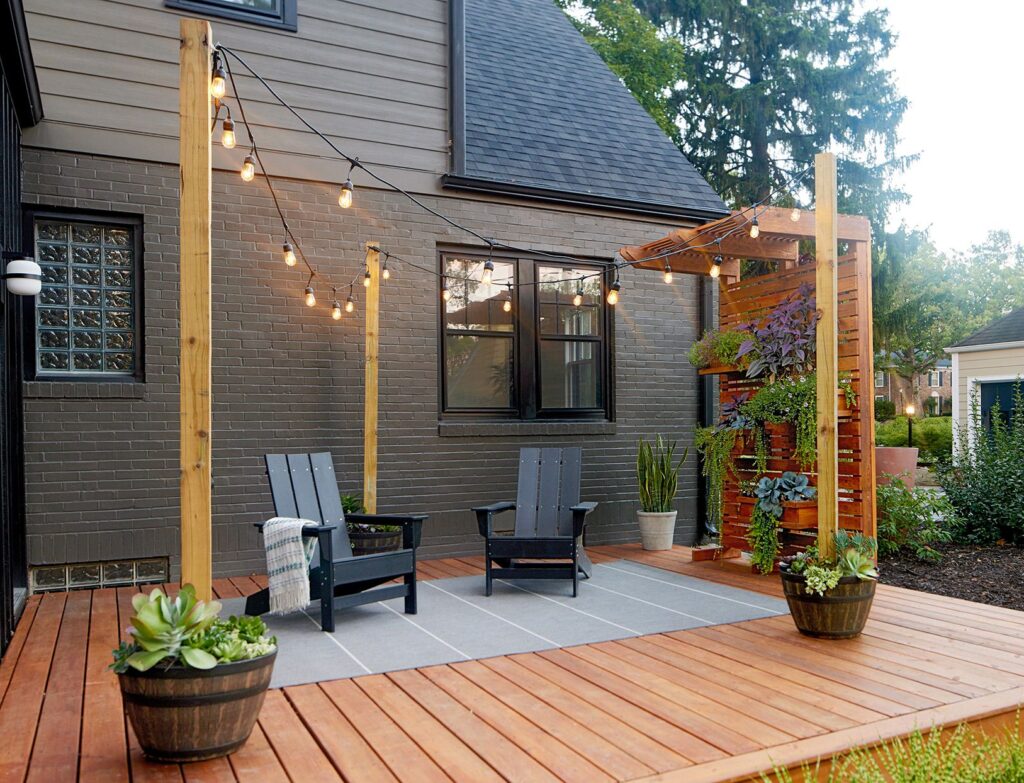
One common option for posts is wooden poles or fence posts. These can be purchased at most hardware stores and are relatively easy to install. They can be stained or painted to match your patio decor, and may provide a more rustic or natural look than other options. However, wooden posts may not be as durable as metal options, and may require regular maintenance to prevent rot or decay.
Metal posts, such as steel or aluminum, are another popular option for outdoor string lights on a patio. These posts are typically more durable than wood, and may be easier to install. They often have a sleek and modern appearance, and can be powder-coated in a variety of colors to match your patio decor. However, metal posts may be more expensive than wooden options, and may also be more susceptible to rust or corrosion.
Regardless of the type of post you choose, the installation hardware you use is equally important. Cup hooks, command hooks, and light poles are all popular options for hanging outdoor string lights on a patio. Cup hooks are a simple and low-cost option that can be screwed directly into wooden posts or using an anchor in stone or concrete. Command hooks are adhesive, meaning they can be attached to most surfaces without drilling holes. Light poles are freestanding and can be used to create a more dramatic effect with your lights.
Guide wires or cable wires are also important for proper installation of outdoor string lights on a patio. These wires can help to provide additional support for the lights, preventing sagging or drooping over time. Pilot holes should also be drilled into any posts or surfaces before attaching hardware, to ensure a secure and long-lasting installation.
In conclusion, when deciding on the type of posts and installation hardware for your outdoor string lights on a patio, it’s important to consider both the functionality and appearance of your setup. Wooden and metal posts offer different looks and durability levels, while cup hooks, command hooks, and light poles are all viable options for installation hardware. Regardless of your choices, proper installation techniques such as guide wires and pilot holes are essential for a safe and functional lighting setup.
Preparing Your Patio for Installation
Outdoor string lights can really enhance the beauty of your patio and create a warm and inviting atmosphere. To ensure a successful installation, it is important to prepare your patio beforehand. Here are some steps you can take to prepare your patio for outdoor string light installation:
1. Assess Your Patio Space: Before you begin installation, assess the available space on your patio and decide on the best location for the lights. Consider the size of your patio and the number of lights you will need. You may want to create a rough sketch of the area and mark out where you want the lights to go.
2. Determine the Type of Light: There are many types of outdoor string lights available, from incandescent bulbs to LED bulbs to solar-powered lights. Decide on the type of light that best suits your needs, as well as the color and style of the light.
3. Check the Electrical Outlet: Most outdoor string lights require an electrical outlet. Make sure you have a power outlet nearby and that it is functioning properly before you begin installation. If you don’t have an outdoor outlet, you may need to hire an electrician to install one.
4. Choose the Right Hardware: Depending on the type of installation you are planning, you may need to purchase hooks, eye bolts, or cable wires to hang your lights. Make sure you choose hardware that is strong enough to support the weight of the lights and that is suitable for the surface you are attaching it to.
5. Prepare Your Patio Surface: To ensure a secure installation, it is important to prepare the surface where you will be attaching the hardware. For wooden posts, drill pilot holes before attaching the hardware. For stone or concrete surfaces, use anchors to secure hooks or eye bolts in place.
By taking these steps to prepare your patio for outdoor string light installation, you can turn your outdoor space into a welcoming and inviting oasis for relaxation and entertainment. Whether you’re hosting a party or simply enjoying a quiet night under the stars, patio string lights add a beautiful and functional light to any outdoor space.
Measuring the Space and Mapping Out Your Design
When it comes to creating a visually stunning patio space with outdoor string lights, proper preparation is key. One of the first steps in the preparation process is measuring the space and mapping out your design. By taking these steps, you can ensure that your string lights are hung in just the right spots for the perfect ambiance.
To start, grab a tape measure and measure the length and width of your patio area. This will give you a good idea of how many strands of string lights you will need. You can also determine if you need to purchase additional extension cords to reach an electrical outlet.
Once you have your measurements, use a rough sketch of your patio to map out where you want your lights to be hung. Consider the layout of your furniture and any natural features like trees or shrubbery. If you don’t have any trees or posts to hang the lights from, consider installing wooden poles or fence posts to hang your lights from.
When designing your lighting layout, keep in mind that you want to create a soft glow rather than harsh, bright light. Make sure your lights are evenly spaced and not too close together, or they will overpower the space and create uncomfortable glare. A guide wire can be used to create a straight line for hanging the lights, ensuring that they are properly spaced and level.
After you’ve mapped out your design, it’s time to start hanging your lights. Use cup hooks or command hooks to attach your lights to posts or your home’s exterior. For larger bulbs or strands of lights, consider using guy wires or cable wires to reinforce the weight and hold up the lights properly.
With careful measurement and design, and high-quality outdoor string lights, you can create the perfect ambiance for your outdoor space, perfect for entertaining guests or simply relaxing with your loved ones. Take the time to properly prepare your patio, and your outdoor lighting will be sure to shine.
Determining How Many Posts and Cords You’ll Need for Your Patio Area
When it comes to hanging outdoor string lights on your patio, one of the most important considerations is determining how many posts and cords you’ll need to hang the lights properly. This will not only ensure that your lights are hung securely, but it will also help you to achieve the desired look and ambiance for your outdoor space. Here’s what you need to consider when determining how many posts and cords you’ll need for your patio area:
1. Measure the length and width of your patio area.
To determine how many posts and cords you’ll need, you first need to know the size of your patio area. Use a tape measure to measure the length and width of your patio, as well as any areas where you want to hang your lights.
2. Decide on the layout of your lights.
Once you know the size of your patio area, you’ll need to decide on the layout of your lights. Do you want to hang them in a straight line or in a pattern? Will you be hanging them from posts or from the exterior of your home? Consider the overall design and theme of your outdoor space when making this decision.
3. Determine the distance between posts.
The distance between posts will depend on the size of your patio area and the layout of your lights. If you’re hanging your lights in a straight line, you’ll need a post for every 10-15 feet of lights. If you’re hanging them in a pattern, you may need more or fewer posts depending on the size and shape of your patio.
4. Decide on the type of posts you’ll use.
The type of posts you choose will depend on your personal preference and the design of your outdoor space. Wooden posts are a popular choice for a natural and rustic look, while metal posts can give a more modern and industrial vibe. Consider both the aesthetic appeal and the durability of the posts when making your choice.
5. Determine the length of your cords.
The length of your cords will depend on the distance between your posts and the location of your electrical outlet. You can use extension cords to reach the outlet if necessary, but make sure to choose cords that are rated for outdoor use and are the appropriate length for your needs.
By following these steps, you can determine how many posts and cords you’ll need to hang outdoor string lights on your patio. With the right layout and design, your patio area can be transformed into a cozy and inviting space perfect for entertaining or relaxing.
Preparing the Posts and Hardware (Wooden Posts, Command Hooks, Cup Hooks, etc.)
Once you have determined the layout and type of posts you will use to hang your outdoor string lights, it’s time to prepare them for installation. Here’s what you’ll need to do:
1. Choose Your Hardware
Before you begin preparing your posts, make sure you have all the necessary hardware. Depending on the type of posts you are using and your preferred installation method, your hardware options may include cup hooks, command hooks, screw eyes, or other types of hooks and hangers.
2. Determine Placement
With your hardware in hand, you can begin planning where to place your hooks and hangers on your wooden posts. Make sure you take into account the overall layout and design of your outdoor space, as well as the distance between posts and the length of your light strings.
3. Make Pilot Holes
Once you have determined the placement of your hardware, it’s time to make pilot holes for the screws. If you are using wooden posts, you’ll want to drill a small hole in the post where you want to install the screw eye or other hardware. This will make it easier to screw in the hardware and prevent the wood from splitting.
4. Install Your Hardware
Now it’s time to install your chosen hooks, hangers, or screw eyes into your wooden posts. Depending on the type of hardware you are using, you may need a screwdriver or drill to secure the screws tightly into place. Be sure to test each hardware piece to ensure it can hold the weight of your light strings.
5. Install Other Support Structures
If you are unable to use wooden posts, or if you want additional support for your light strings, you may need to install other types of support structures. This could include using guy wires or cable wires to suspend your string lights from trees or other structures, or installing light poles or fence posts to attach your light strings to.
By properly preparing your posts and choosing the right hardware for your installation method, you can ensure your outdoor string lights will look beautiful and be safely secured in place.
Creating a Rough Sketch to Guide Installation
Before you start hanging your outdoor string lights, it’s important to have a plan in place. One helpful way to do this is by creating a rough sketch of your patio or outdoor space. This will help guide the installation process and ensure that your lights are hung in the most aesthetically pleasing and functional way possible.
To create your sketch, start by measuring the length and width of your patio or outdoor space. Use a tape measure to record these dimensions as accurately as possible. Next, consider where you want to hang your outdoor string lights. Will they be hung between two wooden posts or attached to the eaves of your house? Will you need additional support structures like light poles or fence posts? Make note of these details on your sketch.
It may also be helpful to mark the distance between each anchor point where you plan to attach your string lights. This will give you an idea of how many strands of lights you need and how long they should be. Additionally, it can be helpful to indicate the placement of your hardware on your sketch. Draw circles or squares where each hook or hanger will be installed and label them for reference.
As you create your rough sketch, keep in mind the type of bulbs you will be using for your outdoor string lights. Will you be using incandescent bulbs, LED bulbs, or larger shatterproof bulbs? This can impact the overall look of your installation, so it’s important to consider it during the planning phase.
By taking the time to create a rough sketch, you can ensure that your outdoor string lights are perfectly placed for a soft, warm glow. This simple step will help you plan your installation and create a beautiful outdoor space that you’ll love to spend time in.
Drilling in Pilot Holes if Necessary
One important step in hanging outdoor string lights on a patio is drilling pilot holes if necessary. Pilot holes are small holes drilled into the wood or other material to guide the screw or hook that will hold the string lights in place. This step can prevent the wood from splitting or cracking when screws or hooks are inserted.
To determine if pilot holes are necessary, consider the material of the surface where you’ll be hanging the lights. If you’re attaching the lights to wooden posts or eaves, it’s likely that pilot holes will be necessary to prevent damage to the wood. If you’re using cup hooks or command hooks on a smooth surface like concrete or stucco, pilot holes might not be necessary.
Before drilling pilot holes, make sure the drill bit you’re using is slightly smaller than the diameter of the screw or hook being used. This ensures a snug fit for the screw or hook and prevents it from wobbling or coming loose. It’s also important to drill the pilot holes straight and perpendicular to the surface, to ensure that the screw or hook goes in straight.
When drilling pilot holes, it’s best to start with a smaller drill bit and gradually work your way up to the desired size. This prevents the wood from splitting or cracking due to the pressure of a larger drill bit. Once you’ve drilled the pilot holes, you can insert the screws or hooks and attach the string lights securely.
While drilling pilot holes might seem like an extra step, it can save time and prevent damage to your patio or outdoor space in the long run. By taking this precaution, you can enjoy your beautiful and functional outdoor string lights without worrying about damage or repairs.
Installing the Outdoor Lighting System
Installing an outdoor lighting system can enhance the beauty of any outdoor space while also providing essential illumination for safety and security purposes. In this article, we’ll cover the key steps to successfully install an outdoor lighting system.
1. Plan your lighting system: The first step is to determine the purpose and location of your lighting system. Consider which areas require light and what type of light will work best, whether it’s spotlights, floodlights, or pathway lights.
2. Choose your lighting fixtures: With a plan in place, it’s time to choose your lighting fixtures. Consider factors like durability, energy efficiency, and style to ensure you choose fixtures that will last and complement your outdoor space.
3. Check your electrical capabilities: It’s important to ensure that your outdoor electrical capabilities can support the additional lighting system. Check the electrical codes and regulations in your area to ensure you’re following the necessary safety precautions.
4. Lay out the lighting plan: Once you’ve determined your electrical capabilities, use a rough sketch to lay out where each lighting fixture will be placed. Ensure you’re not overloading your circuits and that all fixtures are properly grounded.
5. Install your lighting fixtures: Begin by mounting any permanent fixtures, such as large outdoor wall sconces or lanterns. Then, install the pathway lights, making sure they are securely placed in the ground at the desired distance apart.
6. Test your lighting system: After completing the installation of all fixtures and wiring, test the system by turning on each fixture and checking for proper function. Make sure each fixture is producing the desired amount of light and that there aren’t any issues with flickering or dimming.
7. Add finishing touches: Finally, add any finishing touches, such as covering any exposed wiring, adding timers or motion sensors, and ensuring that all electrical connections are properly insulated.
By following these key steps, you can successfully install an outdoor lighting system that will enhance your outdoor space while providing necessary safety and security.